|
|
|
Party Favors
Clay pot Angels ~
Shopping list: mini clay pot, 1" ball knob head Material of choice for wings: 8 inches floral ribbon, 8 inches paper twist ribbon, two 1" wood hearts. Material of shoice for hair: spanish moss, curly hair, doll hair. Ceramcoat acrylic paint: santa's flesh, bouquet, crimson, black. Extra fine back pigna marker.If desired, paint clay pot with acrylic paint or spray paint in color of choice. If using wood hearts for wings, paint desired color with acrylic paint. For a metallic finish, try cold or silver medal paint. Basecoat the knob with santa's flesh. Attach the head to the bottom of the clay pot with hot glue. Use the stencil brush or deerfoot stippler brush to stipple cheeks with bouquet. Dot eyes with stylus in Black. Dot mouth with crimson. Use pigma marker to paint eyelashes. Apply tacky glue to top and back of ball knob head. Place a small amount of spanish moss, curly hair or other doll hair to the top fo the angel's head. Tomake wings, choose one of the following methods: Tie ribbon or paper twist ina bow. Secure with floral wire Paint wood hears as desired. Attach wings to the back of the angle with hot glue.
Reindeer Heart Globe ~
For picture, pattern, and directions click herehttp://www.hobbylobby.com/site2/projects/qc-32/qc-32.htm
Shell Angels ~ For picture, pattern, and directions click here.
http://www.hobbylobby.com/site2/projects/qc-103/qc-103.htm
Decorated Jingle Bells ~ For picture, pattern, and directions click here. http://www.hobbylobby.com/site2/projects/qc-15/qc-15.htm
Clay pot Santa ~
For picture, pattern, and directions click here. http://www.hobbylobby.com/site2/projects/ft-16/ft-16.htmReindeer Food ~
This is a great idea for the younger children. Cut a 5x5 square of green saran wrap, grab a handful of dried quaker oats and place on the wrap, all some giltter any color, gather up all the ends and tie with decorative ribbon. The explain to the kids that on Christmas Eve they need to go out in the front yard and sprinkle the food over the yard so the reindeer can eat while Santa is putting out their gifts. My kids love doing this.Paper Mache' Gift Bags ~
Take a small box the size you want your gift bag and wrap it in plastic wrap. Use strips of paper and paper mache'(white glue works) and cover the box, leaving one end open. Let it dry completely, when it's dry, use paint, glitter, markers, embellishments, and bows to decorate the bags. Punch holes in the top of the bag and tie strings to the holes for the handles. You can use these as gift bags as decorations or as a gift.Snowman Candy Totes ~
You will need; clean tin cans, lids removed, black, white and orange acrylic paint, 3/4"-wide ribbon or fabric for bands, black poster board, 1/4"flat paintbrush, and tacky glue. Paint a black band 1-1/4" to 1 1/2" wide around top of can for hat. Let dry. Paint rest of can white. Trace bottom of can on black posterboard. Then draw a 1/2" to 1" wide circle out from the edge of the circle you traced, for brim. Draw another circle 1/4" smaller inside the first circle for tabs. Cut out brim and center circle. Cut tabs at 1/4" intervals from inner to middle circle. Bend snipped sections up to unmarked side of the posterboard. Glue brim to can where black and white meet. Paint face. Glue on ribbon of fabric hatband and collar.Hands and Feet Reindeer ~
Marerials Needed: brown construction paper, tan construction paper, white paper or wiggly eyes, black or red construction paper or a black or red pom-pom, glue or tape, crayon or marker. Trace two hands on the tan construction paper. Trace one foot (with a shoe on) on the brown construction paper. Cut out the shapes, and arrange as illustrated- with the two hand shapes making the antlers on the deer, glue or tape into place. Turn the project over to the back and write the child's name and date. Draw and cut eyes and a nose (or use wiggle eyes, and a pom-pom for the nose) Glue on the eyes and nose You're done!Christmas light gift Bags ~
You will need a plain brown gift bag, colored construction paper, red and black markers. Cut out light bulb shapes out of the different colored paper. With the black marker, draw and electrical plug in the upper corner of the bag then from there draw a line that curves and does loops up and down the bag, front and back like a string of christmas lights. Then glue the light bulbs on the string in the front and back of the bag. Then with the red marker write "May your Christmas be bright". Also write the childs name and year at the bottom of the bag.Christmas spider ~
You will need to make a spider out of colored (white,clear, red and green)beads and wire. Then type this story and put it with the spider. "The Legend of the Christmas Spider- Once upon a time, a long time ago on Christmas Eve, a mother and her children prepared their home to celebrate the birth of Jesus. Everything was scrubbed and cleaned. When the tree was beautifully decorated, the family went to bed. while they were sleeping, the little spiders, who had been chased from their favorite nooks and cracks, crept back to view the lovely preparations. They were filled with wonder at the tree's glittering beauty. They crawled on every branch to see each shining ornament, but alas, after their inspection the tree was shrouded with webs. Then an angel came and saw what had happened, he smiled at the thought that the spiders wanted to see the tree. As he blessed the tree he touched each web turning it into silver, and the tree glistened with greater beauty than before. This is how it became a custom in many parts of the world to have a spider on the Christmas tree.Stuff Santa Hats ~
Last year we found Santa hats at a dollar store. We took the hats and stuffed them with candy and other small items. The kids loved going through the hat and wearing the hat out from school.Candy Garland ~
Start with two wrapped candies (exp. striped starling mints) and using ribbon, tie a twisted plastic end of one to an end of the secoond mint. Continue until your chain has enough candies for your countdown. Hang your garlands from the mantel or from doorknobs. Each day, untie and eat one piece of candy. FamilyFun November 1999 Attach this cute poem to this garland ~ I'll eat one candy every day so I'll know Santa's on his way And when there are no more to eat I'll hear the sound of reindeer feet.Cardboard Candles ~
First set a cardboard tube on end, (this can be paper towel rolls/tubes or tissue rolls/tubes) Then squirt blobs of white glue right from the bottle around the top of each tube. Allow the glue to run down the sides to create a dropping-wax effect. Let the glue dry thoroughly (it should look clear when it has dryed). Now brush on a coat or two of acrylic paint (I like red) over the dried glue and again let the candle-sitcks dry completely. Finally, cut a flame shape for each candle from a sheet of gld foil wrapping paper. Attach each flame to its candlestick by gluing or taping the lower edge to the inside of the painted tube.Handy Wreath T-shirts ~
What you will need: t-shirt or sweatshirt; green and red fabric paint; newspaper; paper plates Lay the t-shirt or sweatshrit on a flat surface. Put newspaper in between the front and back of shirt. Pour green paint onto paper plate. Put your hands, palms down into the paint. Carefully place your had on the shrit. Lift up. Repeat, making a circle like a wreath. Let dry. Put red paint on a paper plate. Put your thumb into the paint. Press your thumb onto the shirt, adding "berries" to the wreath. A picture of this can be seen in Better Homes and Gardens December 1999 issue.Santa Pencils ~
You will need red or green pencils, small scrap of white fun fur, scraps of red, green and pink felt, white chenille stem (pipe cleaner), moveable eyes, small bell or pom-pom for hat, crafts glue. Cut a 1 inch strip of fur for beard. Cut a red or green felt triangle hat with a base of 1 inch and sides of about 2 inches. Glue the hat on top of the beard. When dry, wrap it around the top of the pencil. Holding the hat in place, wrap a piece of chenille stem around the base of the hat, twisting the ends tightly together. Cut a small oval out of pink felt for the top of Santa's face, and glue onto beard below the hat. Glue on movable eyes and small round felt nose. With small wire or thread tie a bell to the top of the hat or glue on a pom-pom. Use as a stocking stuffer or decoration for a gift. A picture of this can be seen in Better Homes and Gardens December 1999 issue.Play Dough Party Gift ~ Buy playdough 4 packs (usually buy when 99 cents for a pack of 4). Cut up the different colors and then put the different colors in each can. Then you can give one playdough can to each child for a nice gift.Thank you Dean Parsons for sending this idea to us.
 Santa's Tic-Tac-Toe ~ This is a great party favor that you can have the kids make, play and then take home as their gift. What You Need : Printed pattern (click on picture above to get the patterns) * Crayons or markers * Scissors * Thin cardboard and glue to make a stronger game, optional How To Make It :
![]() Jelly Bean Bowl ~ With all the plates of Christmas cookies Santa samples, it's no wonder he's a little soft around the middle. Here, Santa offers a few treats of his own—a sampling of jelly beans or other Christmas candy—stored beneath the fuzzy brim of his hat. MATERIALS: Felt in assorted colors * Glue and scissors * Glass jar with a lid * White faux fur (available at craft or sewing stores) 1. To make the hat, cut out two red felt triangles. Make sure the base of the hat will be big enough to fit over the neck of your jar. Glue together the sides of the two triangles, then trim the hat with a strip of faux fur around the bottom and a bit on top for the pompon. 2. Decorate Santa's face by cutting out and gluing on a faux fur beard, a pair of felt eyes and a felt nose. 3. Fill the jar with candy, put on the lid, then top it all off with Santa's hat.
Jelly Bean Bowl ~ With all the plates of Christmas cookies Santa samples, it's no wonder he's a little soft around the middle. Here, Santa offers a few treats of his own—a sampling of jelly beans or other Christmas candy—stored beneath the fuzzy brim of his hat. MATERIALS: Felt in assorted colors * Glue and scissors * Glass jar with a lid * White faux fur (available at craft or sewing stores) 1. To make the hat, cut out two red felt triangles. Make sure the base of the hat will be big enough to fit over the neck of your jar. Glue together the sides of the two triangles, then trim the hat with a strip of faux fur around the bottom and a bit on top for the pompon. 2. Decorate Santa's face by cutting out and gluing on a faux fur beard, a pair of felt eyes and a felt nose. 3. Fill the jar with candy, put on the lid, then top it all off with Santa's hat.
![]() Cinnamon Dough Ornaments ~ My children have made this in years past and they are great. Make plenty of these ornaments to hang on the Christmas tree or even a door wreath. You can create cinnamon decorations for any occasion by just changing cookie cutters. What You Need : 1 1/2 cups ground cinnamon * 1 cup applesauce * 1/4 cup white school glue (like Elmer's) * Bowl * Plastic food wrap * Rolling pin * Wax paper * Cookie cutters or a knife * Ribbon or yarn for hanging * Straw * How To Make It: Mix cinnamon, applesauce, and glue together in a bowl. The dough should be as thick as cookie dough. Add a bit of water if the dough is too stiff. Remove from bowl and knead. Put it back in the bowl, cover with plastic wrap, and let sit for at least a half hour. Remove the dough, knead again to make sure it's smooth. Flatten/roll the dough between waxed paper until it's between 1/4" thick and 1/8" thick. Cut out desired shapes, use a straw to punch a hole for the ribbon to hang. The circle of dough will pull out with the straw. Gently place the shapes on a piece of clean wax paper. They will take 3-5 days to dry, and you will need to turn them over a couple of times a day for them to dry evenly and flat. Don't be surprised to see that the ornaments get smaller during the drying process. Keep this in mind when you pick out the cookie cutters for your designs. You will also notice that if you do not turn the ornaments over often enough while they are drying, the edges of the ornaments will curl. When dry, thread a piece of ribbon or yarn through the hole to hang.
Cinnamon Dough Ornaments ~ My children have made this in years past and they are great. Make plenty of these ornaments to hang on the Christmas tree or even a door wreath. You can create cinnamon decorations for any occasion by just changing cookie cutters. What You Need : 1 1/2 cups ground cinnamon * 1 cup applesauce * 1/4 cup white school glue (like Elmer's) * Bowl * Plastic food wrap * Rolling pin * Wax paper * Cookie cutters or a knife * Ribbon or yarn for hanging * Straw * How To Make It: Mix cinnamon, applesauce, and glue together in a bowl. The dough should be as thick as cookie dough. Add a bit of water if the dough is too stiff. Remove from bowl and knead. Put it back in the bowl, cover with plastic wrap, and let sit for at least a half hour. Remove the dough, knead again to make sure it's smooth. Flatten/roll the dough between waxed paper until it's between 1/4" thick and 1/8" thick. Cut out desired shapes, use a straw to punch a hole for the ribbon to hang. The circle of dough will pull out with the straw. Gently place the shapes on a piece of clean wax paper. They will take 3-5 days to dry, and you will need to turn them over a couple of times a day for them to dry evenly and flat. Don't be surprised to see that the ornaments get smaller during the drying process. Keep this in mind when you pick out the cookie cutters for your designs. You will also notice that if you do not turn the ornaments over often enough while they are drying, the edges of the ornaments will curl. When dry, thread a piece of ribbon or yarn through the hole to hang.
 Santa Lollipops ~ This is a simple ornament to produce en masse for classmates or to hang on your Christmas tree. MATERIALS: Lollipop (the kind wrapped in plastic) * White and red paper * Hole punch * Glue * Red pompon * Googly eyes * Cotton balls * Thread and tape 1. First, turn your lollipop upside down, then decorate one side of it as Santa's face. Here, we glued on a white paper beard (with a punched hole for Santa's mouth), a red pompon nose and two googly eyes. 2. To make the hat, cut a red paper semicircle, roll it up, and tape it to form a cone (you may need to experiment to get the right size). Glue cotton ball trim around the hat's bottom. 3. Tape a loop of thread to the lollipop stick, then pull the thread through the top of the hat so that it sits on Santa's head. Add a bit of cotton for a pompon.
![]() Starry Santa Tin ~ Here is a neat way to renew an old cookie tin. MATERIALS : Cookie tin * Colored paper * Scissors and glue * Acrylic sealer * Ribbon 1. Trace around the lid onto a solid-color piece of paper, cut out the circle, then glue it to the lid. Next, lightly pencil a rough five-pointed star shape onto the lid. (Tip: Start by making five evenly spaced marks around the edge of the lid for the star points.) 2. Now, let your kids create the Santa within the star pattern. Here, we glued on cut paper shapes (including punched holes for Santa's eyes and nose), but your kids could also use acrylic paints—or even a combination of paper and paint. Seal their design with a thin coat of acrylic sealer. 3. To finish off the tin, glue a piece of ribbon around the outside rim of the lid. Now it's ready to fill with cookies. Check out our Christmas cookies page for some great cookie recipes.
Starry Santa Tin ~ Here is a neat way to renew an old cookie tin. MATERIALS : Cookie tin * Colored paper * Scissors and glue * Acrylic sealer * Ribbon 1. Trace around the lid onto a solid-color piece of paper, cut out the circle, then glue it to the lid. Next, lightly pencil a rough five-pointed star shape onto the lid. (Tip: Start by making five evenly spaced marks around the edge of the lid for the star points.) 2. Now, let your kids create the Santa within the star pattern. Here, we glued on cut paper shapes (including punched holes for Santa's eyes and nose), but your kids could also use acrylic paints—or even a combination of paper and paint. Seal their design with a thin coat of acrylic sealer. 3. To finish off the tin, glue a piece of ribbon around the outside rim of the lid. Now it's ready to fill with cookies. Check out our Christmas cookies page for some great cookie recipes.
Christmas Party Favors ~
Make these individual favors and fill them with small novelty items, such as tiny toys, play jewelry, chocolate coins, pretty hair clips, or hard candies. Materials List : sharp scissors, pinking shears * regular and double-sided transparent tape * star stickers * 8 paper-towel tubes or other cardboard tubes cut into 5-inch lengths * 3 to 4 sheets gift wraps * ribbon or cord, about 3 yards * gifts for inside favors * seals, tassels, colored pens Party Favors: Cut six pieces of wrapping paper into 15- x 7-inch rectangles. Use pinking shears to trim the short edges. Center one favor-filled tube along the long edge of a piece of the gift wrap. Secure the paper to the tube with plain tape. Roll the paper tightly around the tube and secure the seam invisibly with double-sided transparent tape. Carefully tie a 9-inch piece of ribbon or cord around the favor wrappings on either end of the center tube, drawing in the paper evenly. Repeat to make the other favors then decorate as you wish with tassels, seals, stickers, ribbons, or colored pens. Candy Cane Reindeer ~
Bag-O'-Treats
These little friends make wonderful treats! No matter what the season is, you'll find a tasty favor for your party! For the Christmas holidays we have 3 different bags; Reindeer, Snowman, and Sugar Plum Fairy. Please click on the images to see a larger view. General Materials (for each) : 2" plastic foam ball * 5-7/8" x 6-1/2" zipper seal plastic baggie * 4 - 5" length of 1/4" wooden dowel or craft stick * Thick craft glue * Paper, pencil, scissors, ruler, paintbrush, twist-tie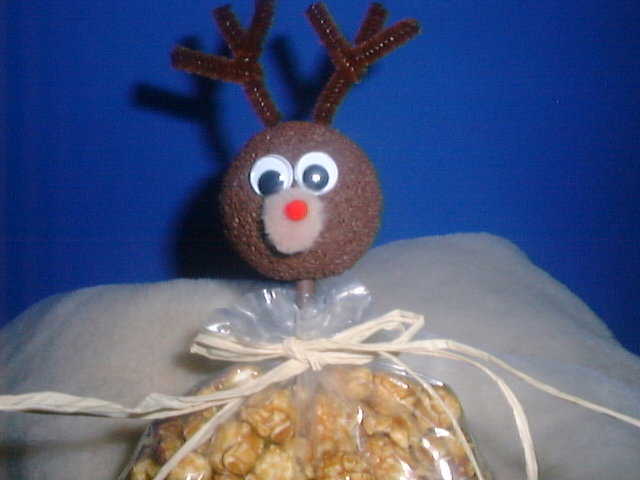 Reindeer Brown acrylic paint * Two 10mm wiggle eyes * 1/2" tan pom-pom * 3/8" red pom-pom * Brown chenille stem * 3 - 4 strands raffia * Caramel corn How to make it........1 For body, apply glue on one end of dowel or craft stick; insert 1/2" of body into plastic foam ball (head). Use brown to paint head and upper half of body. Let dry. Glue eyes on one side of head. For muzzle, glue tan pom-pom below eyes. Glue red pom-pom nose on muzzle. For antlers, cut four 2-1/4" lengths. Wrap one length around another length 1" from one end forming a "V". Repeat same for other antler using remaining two lengths. Apply glue to bottom of antlers and insert into top of head approximately 1/2" apart. Use scissors to cut below zipper seal of bag. Fill bag with treats within 2"-3" from top. Insert body into center of bag. Secure bag with twist-tie 2"-3" from top of bag. Tie raffia in a bow over twist-tie; cut ends to desired length.
 Snowman Acrylic paints: orange, white * Black dimensional paint * Two 10mm wiggle eyes * Black construction paper * 8" length of 3/4" holiday fabric of choice * Wooden skewer * Two cotton balls * White popcorn How to make it.......... 1 For body, apply glue on one end of dowel or craft stick; insert 1/2" of body into plastic foam ball (head). Trace and cut out patterns. (Click here to download a .pdf copy of patterns that you can print and cut out.) Use white to paint upper half of body. Use orange to paint 3/4" from point of skewer. Let dry. Glue brim to top of head. Glue short ends of hat side together overlapping edges 1/4". Let dry. Glue hat side to top of brim. Pull cotton balls apart and insert into top of hat. Apply glue to edges of hat top and place on top of hat side. Let dry. Glue eyes on one side of head. For nose, use scissors to cut 3/4" from point of skewer. (Note: Adult supervision may be necessary to cut skewer.) Apply glue to cut end of nose; insert nose into head below eyes. Use black to paint smile. Use scissors to cut below zipper seal of bag. Fill bag with treats within 2"-3" from top. Insert body into center of bag. Secure bag with twist-tie 2"-3" from top of bag. For scarf, tie fabric in a knot over twist-tie.
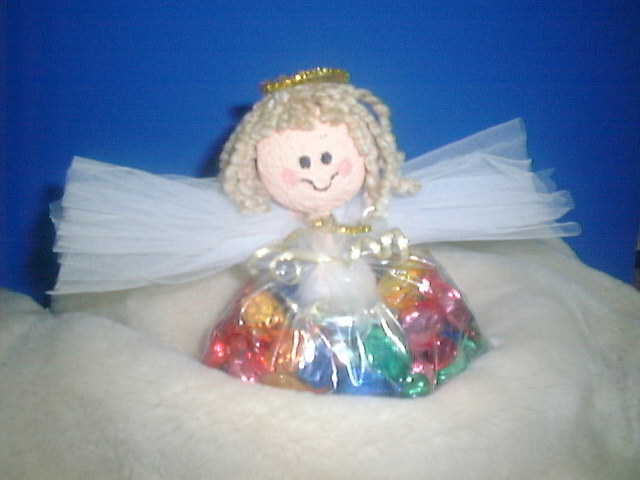 Sugar-Plum Fairy Angel Acrylic paints: flesh color of choice, black, pink * Loopy yarn in choice of color * 8" x 24" length of white tule * 8" length of 1/4" gold wired ribbon * Gold chenille stem * Black fine-line permanent marker * Cotton swab * Individually wrapped candy How to make it...... 1 For body, apply glue on one end of dowel or craft stick; insert 1/2" of body into plastic foam ball (head). Use flesh color to paint head and upper half of body. Let dry. Dip handle end of paintbrush into black; touch handle to head for eye. Repeat for other eye. Use cotton swab and pink to paint cheeks on face. Let dry. Use marker to draw a smile from cheek to cheek. For hair, cut twenty 6-1/2" lengths from yarn. On flat work surface, place lengths side-by-side so ends are even. Tie one length in a knot to center of lengths. Glue hair on top of head spreading hair over sides and back of head. For bangs, cut eight 1" lengths from yarn. Glue bangs to top front of head. For halo, cut a 7" length from chenille. Center and wrap chenille around paint bottle; twist ends together. Insert ends into top back of head. Gather tulle at center forming an 8" wide wing. Cut a 4" length from chenille and twist to center of wing. Place wing to back of body just below head; twist chenille to front of body just below head. Use scissors to cut below zipper seal of bag. Fill bag with treats within 2"-3" from top. Insert body into center of bag. Secure bag with twist-tie 2"-3" from top of bag. Tie ribbon in a knot over twist-tie. Wrap ends around pencil. Remove pencil.
Elf Boot ~ You will need 2 sheets of felt, bells, sewing machine, needle and thread, pins pattern on poster. First cut out pattern and pin to felt. Cut out boot shapes, one red and one green. Sew felt together with a 1/4" seam allowance. Snip edges and turn right side out. Hand stitch bells to toe. Fold top down to form a cuff and hand stitch bells around cuff. Click here to see a pic. of this party favor. You can fill this with candy canes or any other kind of candy and treats for a Great party keeper.
Sugar-Plum Fairy Angel Acrylic paints: flesh color of choice, black, pink * Loopy yarn in choice of color * 8" x 24" length of white tule * 8" length of 1/4" gold wired ribbon * Gold chenille stem * Black fine-line permanent marker * Cotton swab * Individually wrapped candy How to make it...... 1 For body, apply glue on one end of dowel or craft stick; insert 1/2" of body into plastic foam ball (head). Use flesh color to paint head and upper half of body. Let dry. Dip handle end of paintbrush into black; touch handle to head for eye. Repeat for other eye. Use cotton swab and pink to paint cheeks on face. Let dry. Use marker to draw a smile from cheek to cheek. For hair, cut twenty 6-1/2" lengths from yarn. On flat work surface, place lengths side-by-side so ends are even. Tie one length in a knot to center of lengths. Glue hair on top of head spreading hair over sides and back of head. For bangs, cut eight 1" lengths from yarn. Glue bangs to top front of head. For halo, cut a 7" length from chenille. Center and wrap chenille around paint bottle; twist ends together. Insert ends into top back of head. Gather tulle at center forming an 8" wide wing. Cut a 4" length from chenille and twist to center of wing. Place wing to back of body just below head; twist chenille to front of body just below head. Use scissors to cut below zipper seal of bag. Fill bag with treats within 2"-3" from top. Insert body into center of bag. Secure bag with twist-tie 2"-3" from top of bag. Tie ribbon in a knot over twist-tie. Wrap ends around pencil. Remove pencil.
Elf Boot ~ You will need 2 sheets of felt, bells, sewing machine, needle and thread, pins pattern on poster. First cut out pattern and pin to felt. Cut out boot shapes, one red and one green. Sew felt together with a 1/4" seam allowance. Snip edges and turn right side out. Hand stitch bells to toe. Fold top down to form a cuff and hand stitch bells around cuff. Click here to see a pic. of this party favor. You can fill this with candy canes or any other kind of candy and treats for a Great party keeper.
 Back to Christmas